Quick start
Configuration Goals
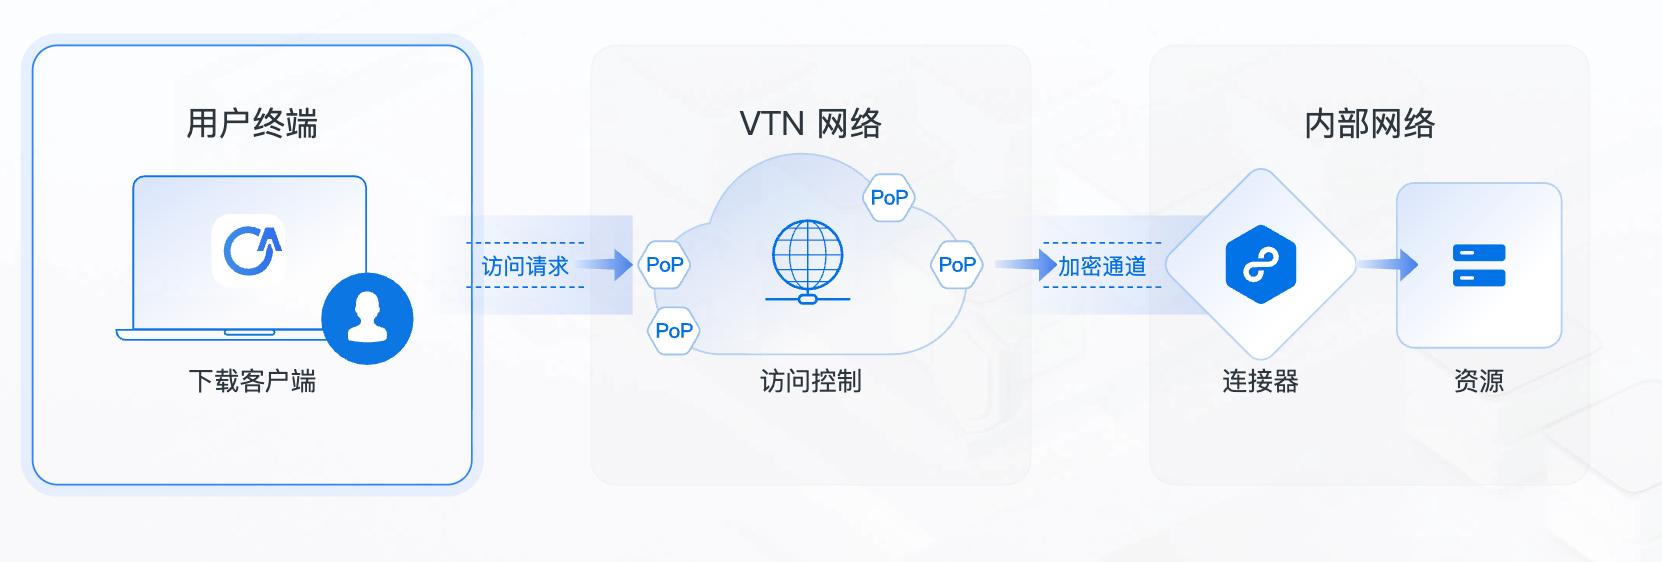
Welcome! Follow the steps below to establish internal network connectivity and achieve fast, secure access to internal network resources!
Configuration Prerequisites
- You already have an account for the VTN (Velocity Trusted Network, hereinafter referred to as VTN) platform. Get a free trial account
- You have a server with a Linux environment in the internal network to deploy the connector for connecting to the internal network.
Overview of Steps
1. Connect Your Internal Network
You will deploy a connector in the internal network to establish an outbound secure connection from your internal network to the VTN network.
2. Configure Access Policies
You will configure user access policies in the console to allow only specified users to access designated resources in your internal network.
3. Download the Client
Authorized users can log in to the client to access resources in your internal network through the VTN network.
Detailed Steps
1. Connect Your Internal Network
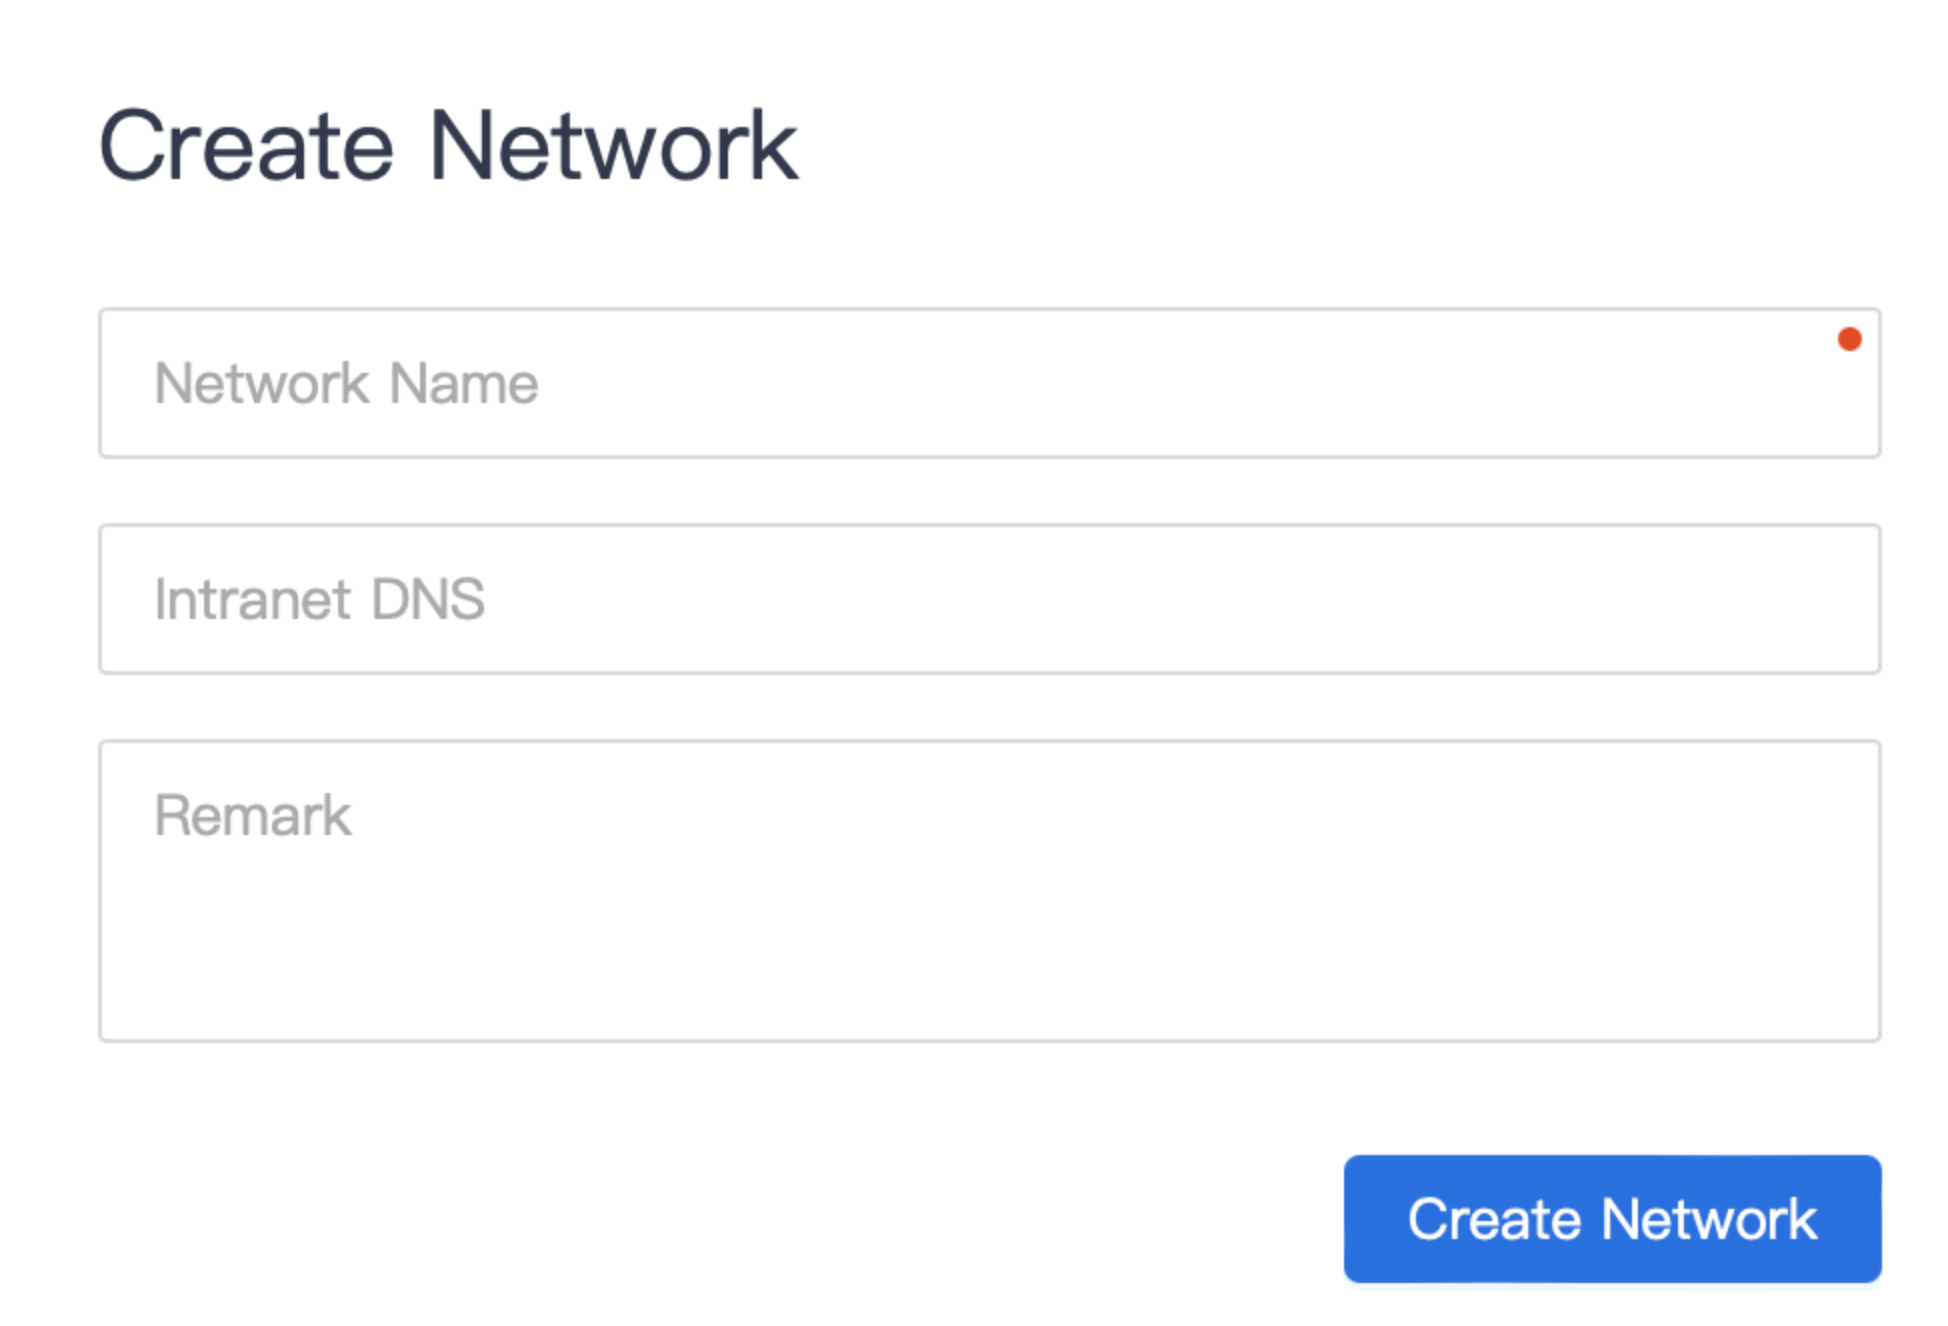
Create a Network
The first step is to define and create your internal network. A network refers to the internal network where your resources are located, which may be a private network of a local data center, a VPC network on a cloud, etc. You may have one or more networks.
Steps to create a network:
- Click 【Resources】-【Networks】in the navigation bar to enter the network list;
- Click "Create Network";
- Enter a network name, such as "East AWS VPC";
- Enter the internal DNS address as needed. Domain names in this network will be resolved through this DNS service by default, supporting IPv4 and IPv6 formats;
- Click "Create Network" to complete the network creation.
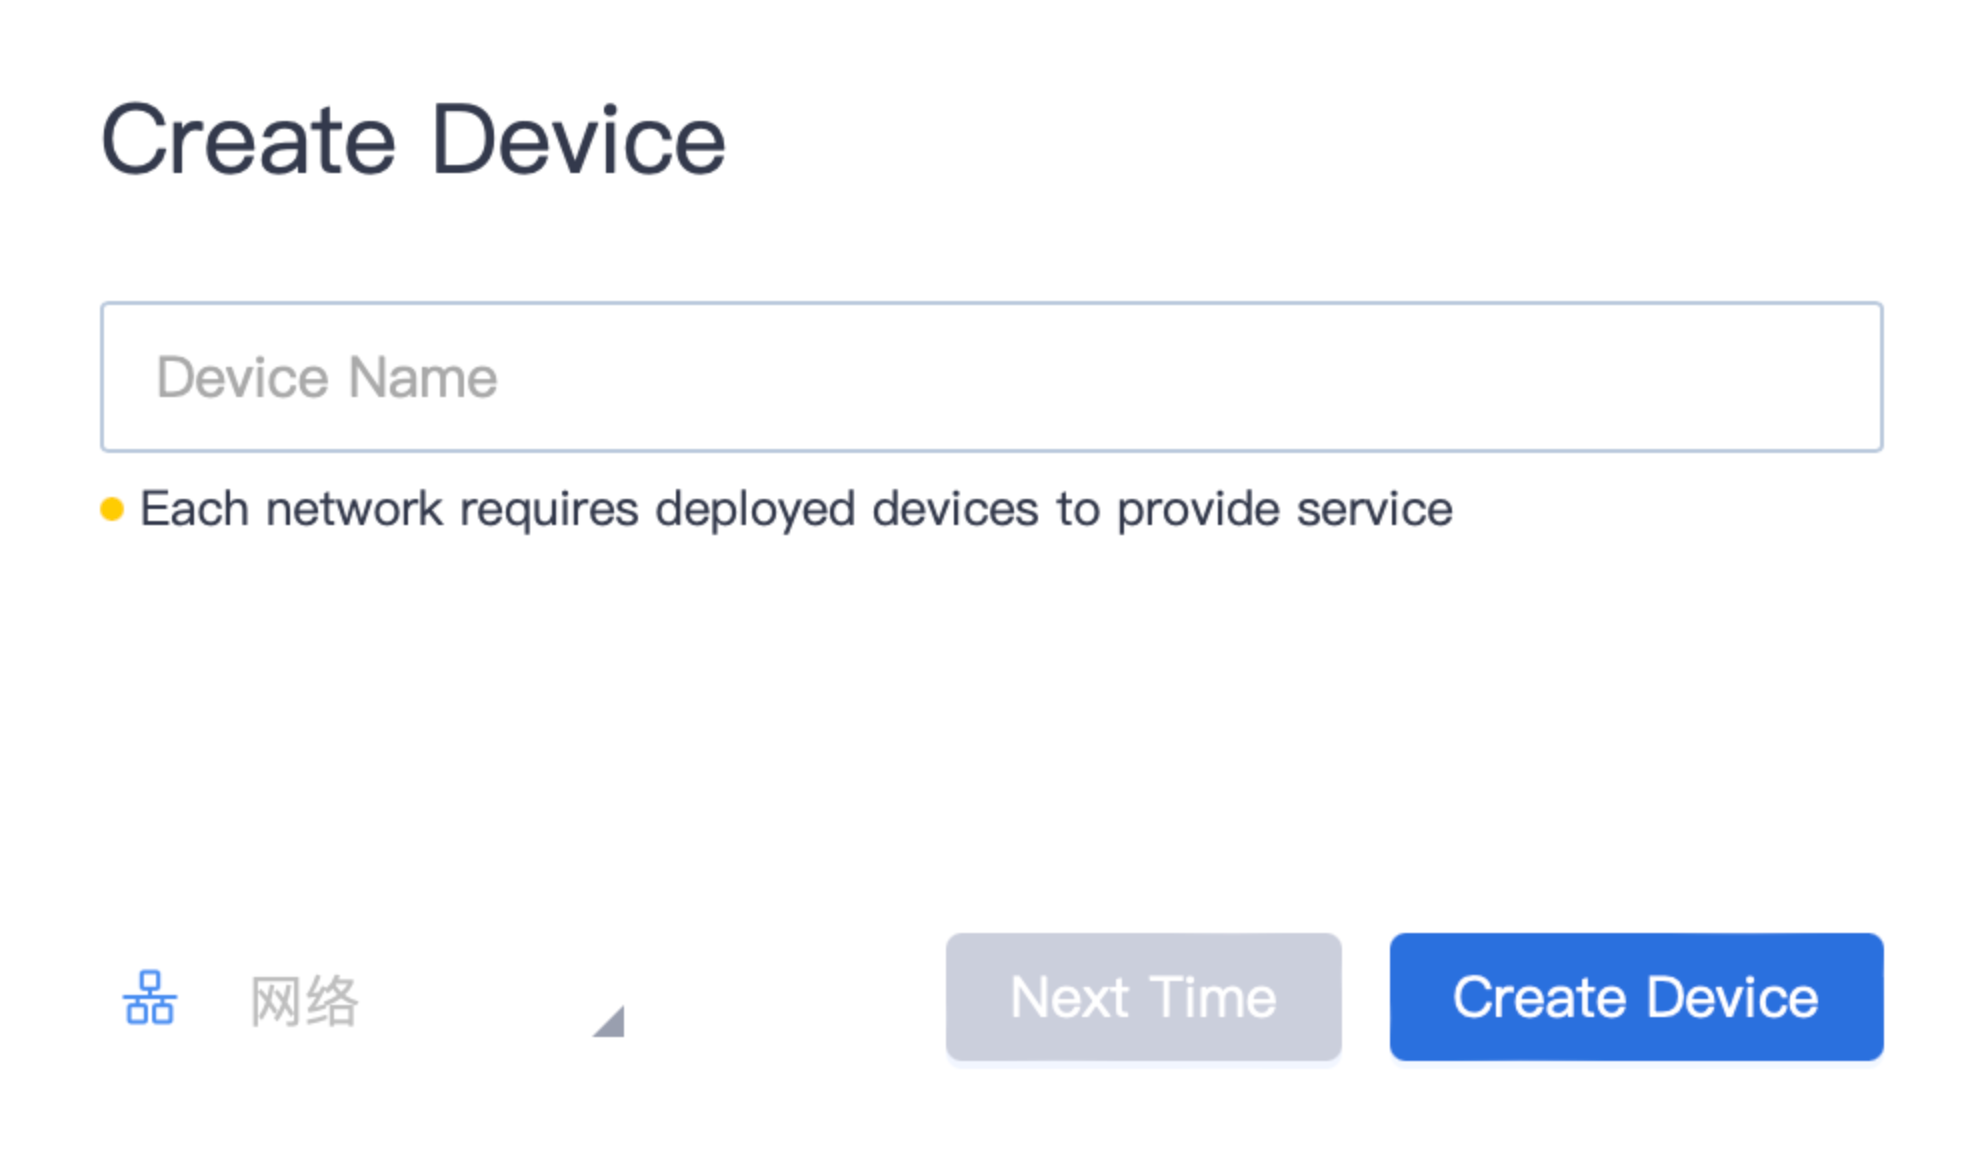
Deploy the Connector
The connector is a proxy service deployed on a server in the network. The internal network is not accessible from the outside by default, and the connector is the key to enabling internal network access.
At least one connector device needs to be deployed in a network. For organizations with high availability requirements, it is recommended to deploy at least 2 connector devices, which use active-active mode by default with built-in load balancing.
First, you need to create a connector in the console to obtain the configuration:
- Click 【Resources】-【Connectors】in the navigation bar to enter the connector list;
- Click "New Connector";
- Enter the connector device name, such as "East China Connector-1";
- Associate the specified network, indicating that this connector is used to access resources in that network.
- Click "Create Device" to complete the creation.
After creating the connector device, the platform will automatically generate deployment-related command. As shown in the figure below, you can choose three different deployment commands: docker, rpm, and deb as needed.
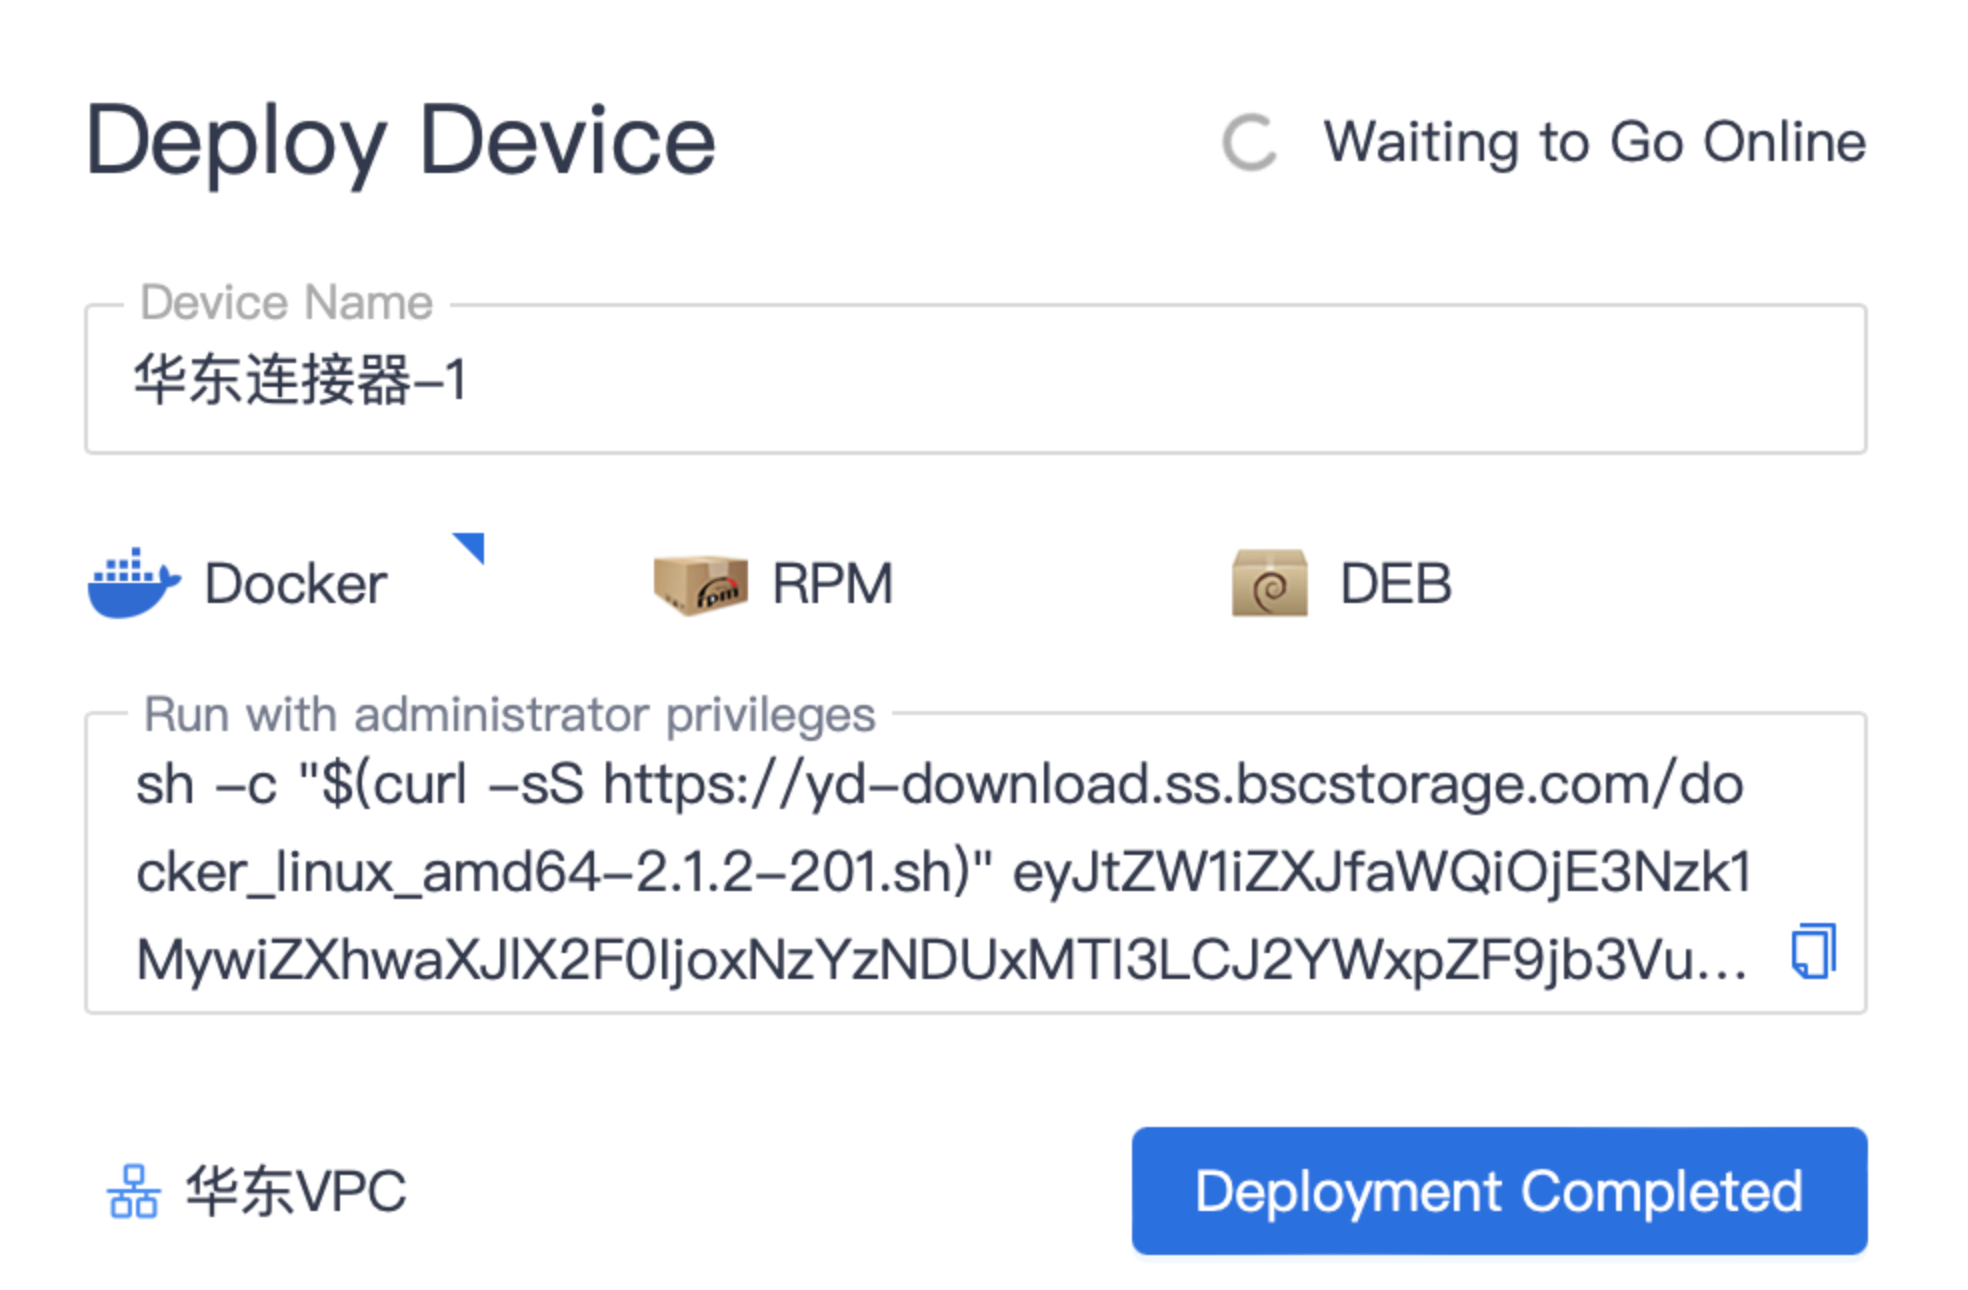
Finally, you need to perform the deployment operation on the server you prepared in advance based on the above command. Ensure that the server can normally request all resources in the network.
Once you run the command on the server, the connector software will be automatically downloaded, installed, and run. The status of the connector device in the console will be automatically updated to online.
create resource
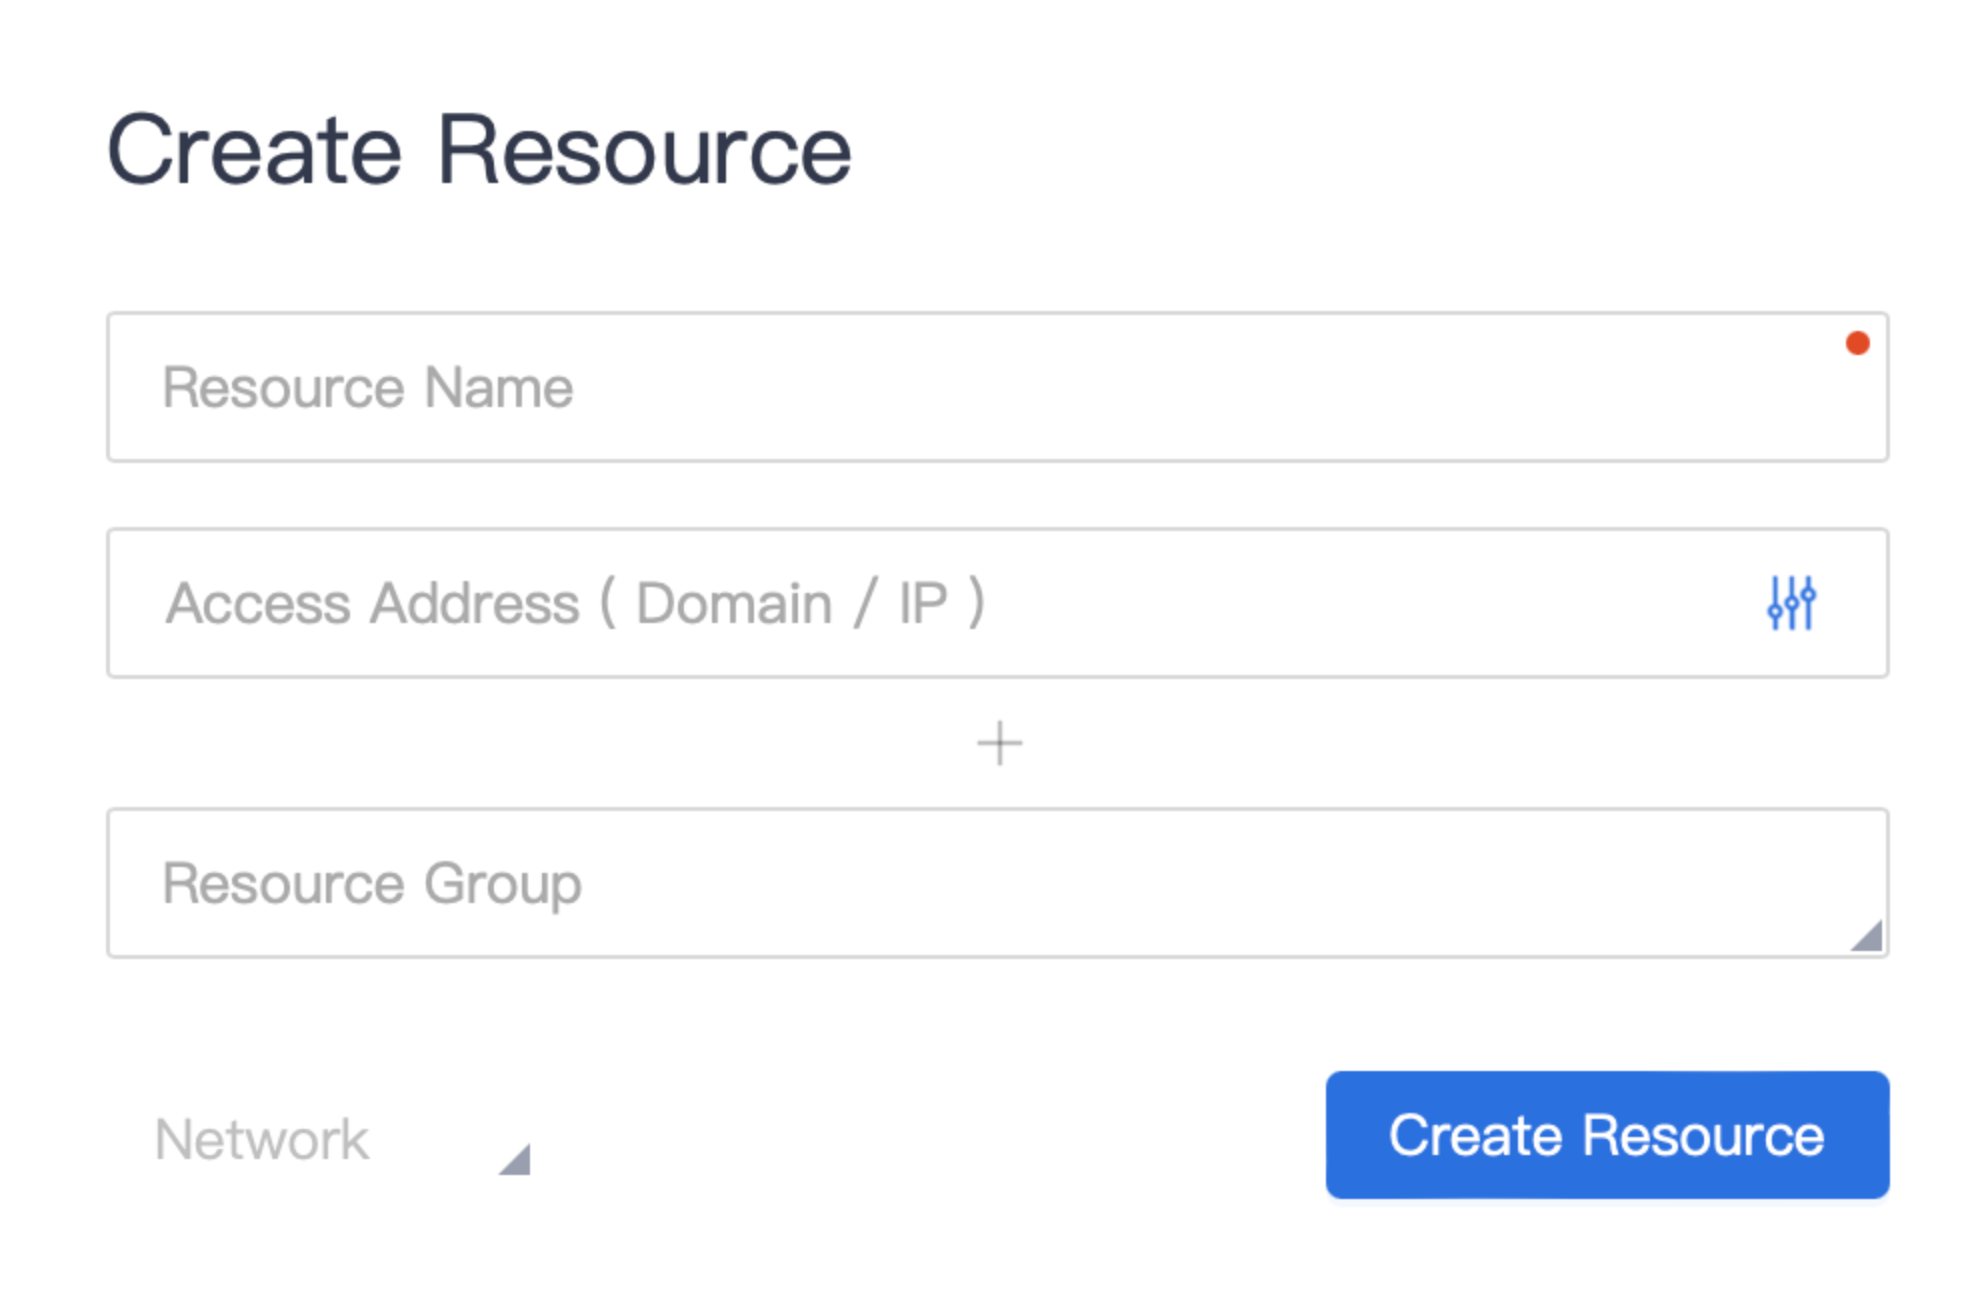
After completing the network connection, you need to define the resources in the network that need to be accessed. A resource represents one or a type of service, which may be OA, ERP, financial software, servers, etc.
Steps to create a resource:
- Click 【Resources】-【Resources】in the navigation bar to enter the resource list;
- Click "New Resource";
- Enter the resource name, such as "OA Application";
- Enter the resource address, supporting domain name/IP format, such as "example.com". By default, all protocols and ports are allowed; you can configure protocols and ports as needed;
- Associate a resource group (optional) to facilitate authorization for the resource group later;
- Associate the affiliated network. Users will access the resource through the connector in this network;
- Click "Create Resource" to complete the creation.
2. Configure Access Policies
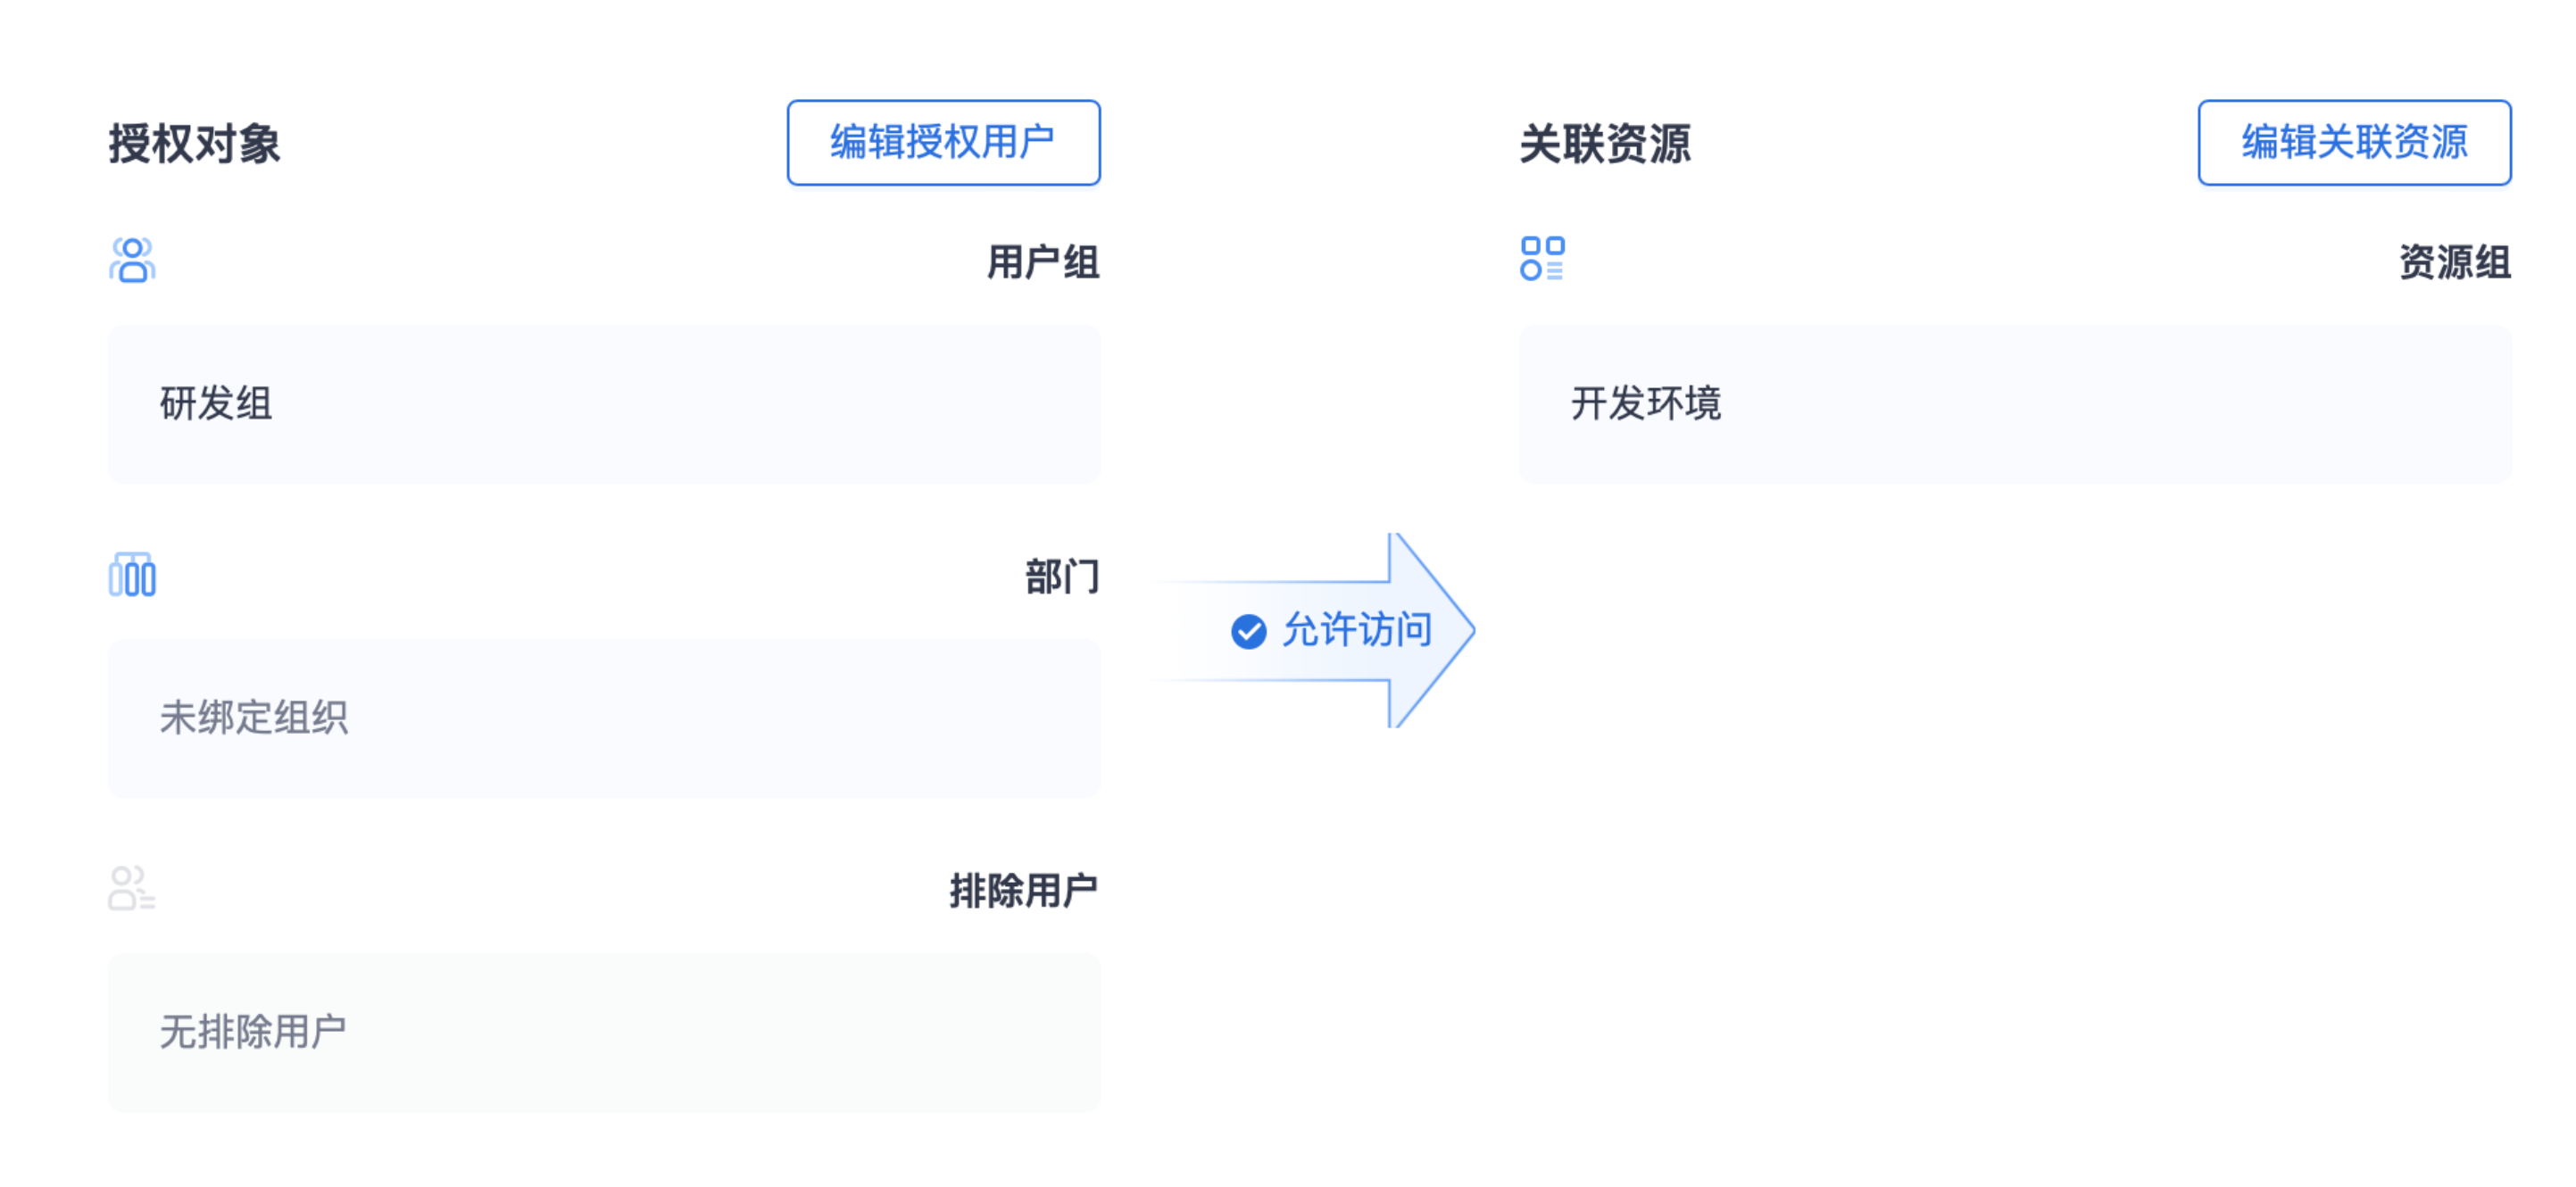
The VTN platform adheres to the zero-trust principle of "default distrust", and resources are not accessible by default. When an access request reaches the VTN gateway, the VTN gateway will execute the access policy and only allow requests that match the access policy to pass.
Steps to create an access policy:
- Click 【Policies】in the navigation bar to enter the policy list;
- Click "New Rule", enter the rule name, such as "Development Environment Access Policy", and click "Create Rule";
- You will be automatically directed to the rule configuration page;
- Edit authorized users: support binding one or more user groups and departments, and also support excluding specified users;
- Edit associated resources: support binding one or more resource groups;
- Save the changes, and the policy will take effect immediately, allowing authorized users in the policy to access the specified resources securely and quickly.
3. Invite Users and Download the Client
Invite Users
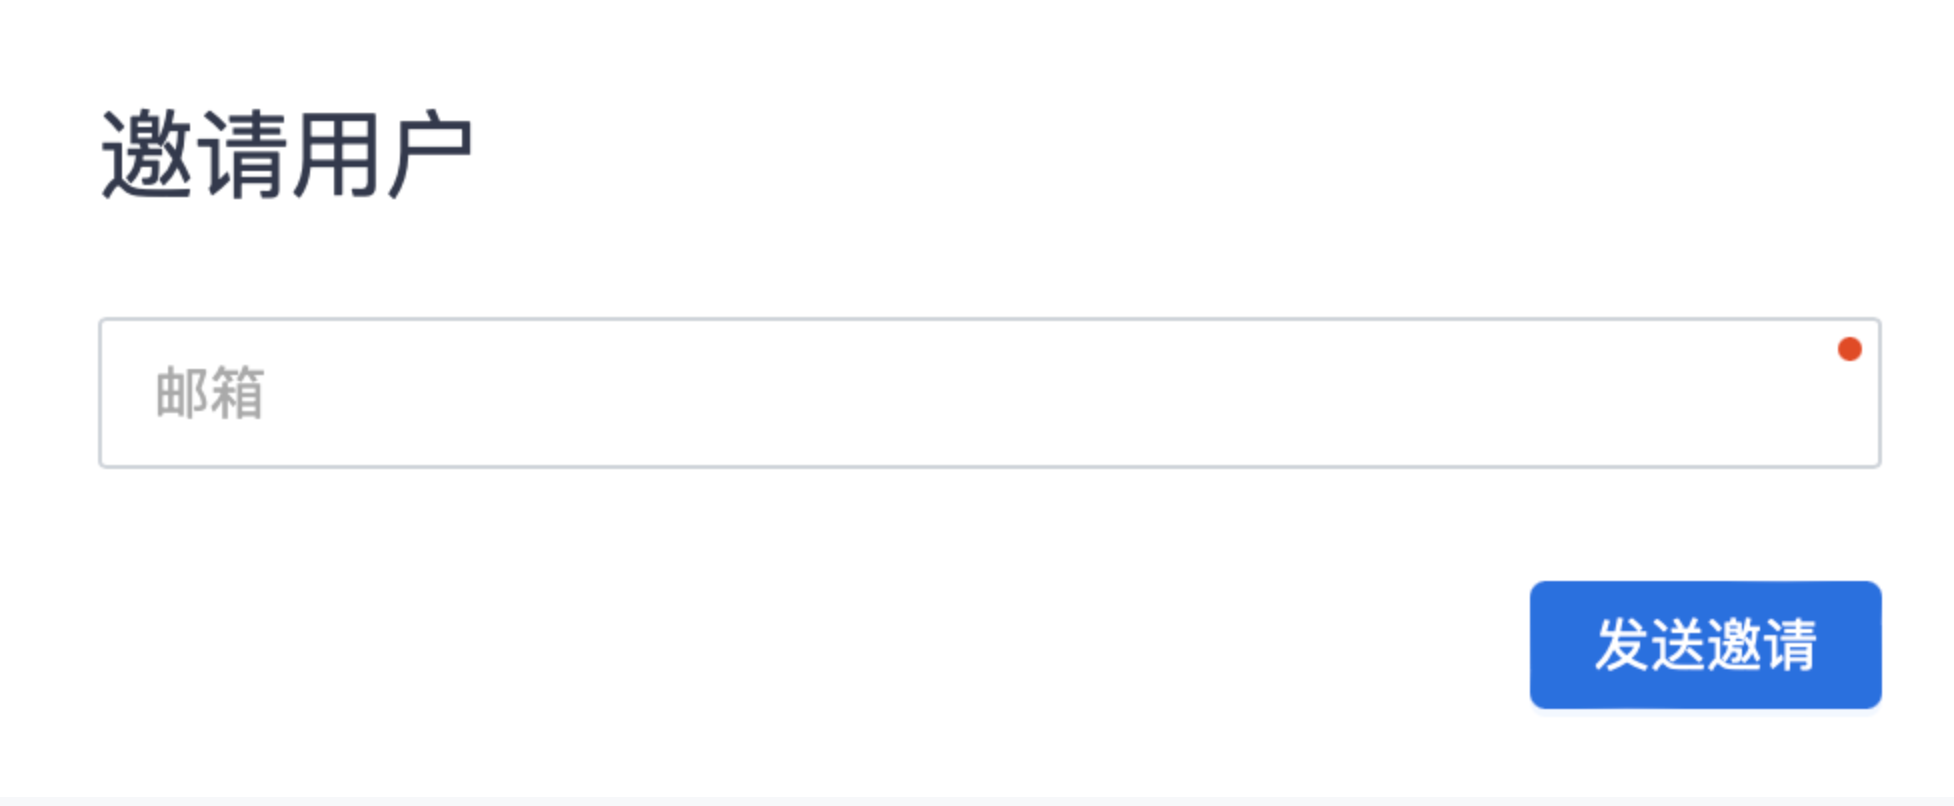
After completing the network and policy configuration, you can invite users to use the service.
- Click 【Users】in the navigation bar to enter the user list;
- Click "Create User", enter the user's email address, and click Send Invitation;
- After completing the user invitation, the user account will be enabled by default, and the user will receive an invitation link from the platform via email, including client download and login information.
Download, Install, and Log In to the Client
After users download and install the client from the download link, they can log in to the client and start their VTN high-speed trusted access journey.
Login steps:
- Enter the enterprise ID, which will be synchronized to the user via email;
- Click the Login button to automatically jump to the login page;
- Select the login method. Cloud AD (the platform's built-in login service) is provided by default;
- Click Cloud AD, enter the user's email address, click Get Verification Code, enter the verification code, and submit the login;
- After logging in, you can start secure and fast internal network access.